


Composting has honestly been one of the most rewarding little projects I’ve taken on, and if you’ve been wanting to try composting in Morocco, I want to show you one of the easiest and most practical ways to start: the good old DIY compost bin.

You do not need a proper garden or a patch of land to get going. You just need some kind of outdoor space you can access, whether that’s your rooftop, patio, or balcony.
There are indoor composting methods too, and I do hope to talk about those in another post, but they need a bit more setup and faff, and for now I’d rather keep things simple.
When I first came across composting, I had very little clue what I was doing. I just liked the idea of reducing our household waste and turning scraps into something useful. That alone was enough to draw me in.
You’ll probably notice that I’m quite passionate about this topic, because I do plan to share more about it going forward. As I find myself leaning back into self-sufficiency again, which I genuinely think every household should know at least a little about, composting is always one of my favourite places to start.
It’s practical, it’s beneficial, and it feels oddly exciting for something that is, in essence, a managed pile of peelings you usually bag and put it in the bin.
In this guide, I’ll walk you through how to start composting in Morocco using a DIY outdoor compost bin, what worked for me, what went a bit sideways, and how to make the whole thing much easier from the start. My first attempt, for the record, was a complete mess. Very educational. Very humbling. Very fragrant, and not in a nice way.
What is composting, and why should you bother?
Well, one very nice thing about composting is that when the bin men are on strike, you get to sit there with your tea feeling quietly smug while everyone else is wondering what to do with their waste.
Composting is simply the natural breakdown of organic materials into a dark, crumbly compost that your soil can actually benefit from.
Things like fruit and veg scraps, dry leaves, cardboard, twigs, and other biodegradable bits from the house or garden all go into the mix. Give it enough air, moisture, and the right balance, and the tiny hardworking microbes take over.

The end result is compost you can add to your plants or mix into your soil to improve fertility, texture, and water retention. It is wonderfully satisfying, and it has a way of making you feel oddly accomplished for someone dealing with tea bags and eggshells.
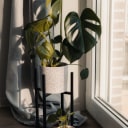
Even if you are not growing anything yet, you can still put your compost to good use. Save it for later, give it to a friend with a garden, or offer it to a tree you’ve taken a liking to.
Still, I do think using your own compost on your own plants is where the real joy is. You reduce your household waste, feed your soil, and feel like the sort of woman who has her life together.
Why I chose a DIY compost bin
There are several ways to compost, and the method I use is cold composting in a plastic drum bin with a lid. For me, it is the most practical place to begin. It is affordable, simple to set up, and easy enough for regular home use.

30-minute private clarity call
Need straight answers about moving to Morocco?
If you’ve been researching, overthinking, and not knowing what to do, this call gives you space to ask your unfiltered questions.
Bring your biggest concerns, get honest insight, and leave with clearer priorities, realistic next steps, and a calmer head, insha’Allah.
Personal support for readers serious about hijrah, settling in, and making wise next moves.
You can always experiment later with worm composting, tumblers, or larger compost systems. For a first step, though, a basic bin does the job beautifully.
Step 1: Gather your materials
To make a simple DIY compost bin, you’ll need:
- A plastic drum bucket or rubbish bin with a lid
- A drill
- A slightly wider bucket or tray to place underneath, to catch any excess liquid

I like using a large plastic drum bucket because it’s easy to drill into, easy enough to move, and easy to cover. The lid is important too, because it helps keep pests out.
Now, finding large drum buckets in Morocco, or at least in Tetouan, can be a bit of a mission. We found one in a supermarket once, and I have not seen it again since.
You can absolutely use smaller and different shape of bins, though if you want enough space for regular kitchen scraps, I’d still recommend getting the biggest (and tallest) ones you can find, and having more than one if possible.

When I was in the UAE, I had three drum buckets. That worked well for us, especially as we had chickens too, so some scraps went to them and some went into the compost.
If you have a bigger household, or more garden waste to deal with, having a second and third bin ready is genuinely helpful.
Once one bin is full, leave it alone to decompose and start filling the next one. That part is important, because every time you add fresh waste to a compost bin, the process slows down a bit and has to catch up again.
Also, if your compost bin is sitting on a balcony, patio, or rooftop with a solid floor, put it on top of a wider bucket or tray to catch any excess liquid.
When my bin was in a yard, I did not bother with this. The earth handled it. On a proper floor, though, you’ll want something underneath unless you fancy explaining mysterious compost drips.
And the nice part is, that liquid can still be useful for plants once diluted properly. Even that nasty bit has potential!
Step 2: Drill air holes into the bin
Once your bin is ready, it’s time to drill ventilation holes around the sides and a few near the base.

Compost needs air to compost properly. The microbes doing all the hard work need oxygen, so giving the bin decent airflow helps everything break down as it should.
It also lowers the chances of the compost becoming wet, heavy, and offensively smelly, which is really what we’re all trying to avoid.
You can make the holes small, or a little larger if you plan to cover them with mesh for extra protection from pests.


I usually prefer keeping things simple, but either option works as long as the bin can breathe.
Once you’re done, wash the bin well to remove any plastic pieces left behind from drilling.
Step 3: Choose a good spot in your building

Because many people in Morocco live in shared buildings or apartments, the next question is usually where to actually put the compost bin without causing a scene.
The rooftop is often a very practical option. Although this highly depends how many household share the roof, how big it is and whether you’re unfortunate to share a building with Uncle Miserable.
When we stayed with my sister, I put ours on the roof and kept it far from the entrance. That helps, because if the bin gets out of balance and starts attracting flies, at least they are not greeting everyone on the way upstairs.
Now, a healthy compost does not generally attract flies, just so you know! If it does, it’s usually that the balance is off and you can fix it by simply adding more brown matters.
A balcony or patio can work too, and if you have a garden or access to a yard, even better. That’s personally my favourite option.
I now have access to a bit of land, and I’m hoping to keep most of my compost bins there.
A yard also brings more insects and tiny creatures that help break things down, which feels like having extra staff on site.
As for the exact spot, compost bins do best somewhere with some warmth and some shade. A little sun helps keep the process moving, especially in cooler weather.
Step 4: Start filling your compost bin

This is where composting in Morocco starts to feel rewarding, because most homes already have a decent amount of compostable material coming out of the kitchen every day.
What your compost bin needs is a balance of greens and browns.
Greens, the nitrogen-rich materials
These include:
- Fruit and vegetable scraps
- Coffee grounds
- Tea leaves or paper tea bags
- Eggshells
- Fresh grass clippings
- Garden trimmings
Browns, the carbon-rich materials
These include:
- Dry leaves
- Straw
- Twigs
- Shredded cardboard
- Plain paper
- Newspaper without glossy coating
As a general guide, aim for around two to three parts browns to one part greens. It does not need to be measured with scientific precision, so you can relax.
Personally, I like to start with a base layer of sticks or twigs to improve airflow.
After that, I add kitchen scraps like veg peelings, eggshells, and tea bags, then cover those with something dry like shredded cardboard or leaves.
A small sprinkle of garden soil on top can help introduce helpful microbes too.


Layering things as you go makes a big difference. It keeps the bin better balanced and helps you avoid the kind of soggy, fly-friendly situation that makes people give up on composting forever.
(I don’t wanna lose you!!)
After adding everything to the bin, I like to give the pile a little sprinkle of water.
Your compost should feel like a damp sponge. Not dry and dusty, and not dripping wet either.
A few things to leave out
For a simple home compost bin, it’s best to avoid:
- Meat
- Dairy
- Oily or greasy food
- Pet waste
These can attract pests, cause stronger smells, and make the compost much unpleasant to deal with.
Step 5: Keep an eye on it
Once the bin is going, the job becomes mostly maintenance.
Try to:
- Collect browns regularly and keep the stocked
- Keep the pile slightly moist
- Turn or mix it every so often to improve airflow and speed up the decomposition process
- Chop larger scraps into smaller bits when possible (this helps to break things down faster)
Smell is one of the easiest clues.
If it starts to smell sour or unpleasant, it usually means the balance is off, often because the pile is too wet or too rich in greens.
In that case, just add more brown matters and the compost will fix itself.
Step 6: Let it decompose properly
Once your bin is full, leave it to get on with the job.
At some point, you’ll notice the contents starting to shrink. That part is always strangely rewarding. Though even if it suddenly looks like you’ve got room again, try not to add anything else. It’s much better to leave that bin to finish breaking down and move on to a second one instead.
Once a compost bin reaches that stage, it needs time to work through what’s already inside. Fresh scraps only slow it down by restarting the cycle a little, and the whole thing ends up taking longer.
If you can manage it, give the contents a turn every few days, or at least once a week. That helps with airflow and keeps everything decomposing more evenly. Warm weather can speed the process up nicely too, which where we’re headed now… Moroccan spring and then summer, insha’Allah!
A few tips to make composting easier
When I first started, the biggest problem was a lack of system. I had scraps in one place, cardboard in another, and vague optimism holding the whole operation together.
A little organisation and help makes a huge difference!
1. Keep your composting supplies together
Set up a simple station near the bin if you can. Useful things to keep nearby include:
- A container for storing brown materials
- A watering can
- A fork or stick for turning the pile
- A bag of soil or dry leaves
- A kitchen scrap container with a lid (to transfer from kitchen to the compost site)
Having browns ready to go makes the whole process much easier, especially since they’re often the first thing I run out of, and you’ll want them on hand to cover food scraps straight away.
2. Get the family involved
Composting can easily become a shared family task, if you let it be.
Children can help with simple jobs like carrying scraps, shredding cardboard boxes, or turning the pile
It is practical, educational, and honestly much nicer when the whole thing does not rest on one person who is probably already doing more than enough.
Final thoughts on composting in Morocco
One thing that genuinely surprised me is how little composting seems to come up here, even though so many people in Morocco grow things at home or have family connected to the land in one way or another.
SubhanAllah, perhaps that says something about how fertile and generous the soil already is.
Even so, composting in Morocco can be simple, beneficial, and very manageable once you have a basic system in place. You do not need ideal conditions. You need a workable bin, a good mix of greens and browns, some patience, and a willingness to learn as you go.
Start with what you have. Keep your kitchen scraps, save your cardboard, put a lid on the bin, and allow yourself the space to enjoy the process.
The first attempt might be slightly chaotic. Mine absolutely was. Apparently that is part of the fun and becomes a story to tell.
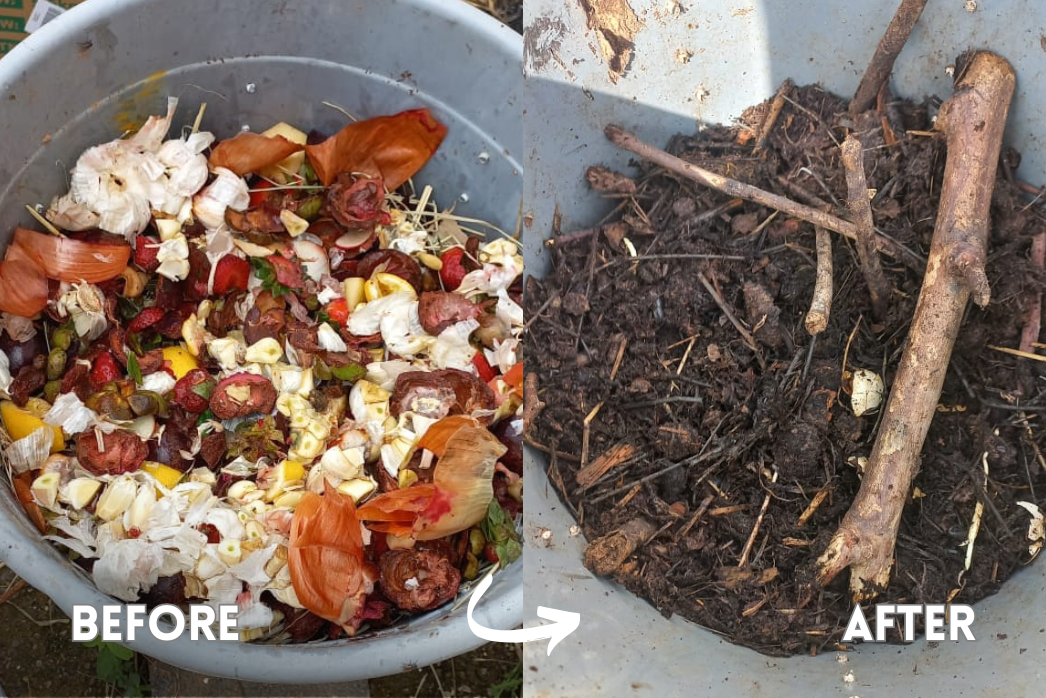
Let me show you my success:
With a little consistency, you’ll soon have compost of your own to feed your plants, reduce household waste, and make you feel surprisingly accomplished over a pile of old peelings.
If you give it a try, I’d love to hear how it goes!